Saturday, April 21, 2018

AECP Level III-Muse

Hi Friends!
I am sharing my project for the Muse class taught by Carissa Wiley. This class was extremely informative and really peaked my artistic interest. It showed me how to look at everything around me as a potential piece of inspiration for a card. One of the photos Carissa shared on her Pinterest Board inspired my project. Here is the image:
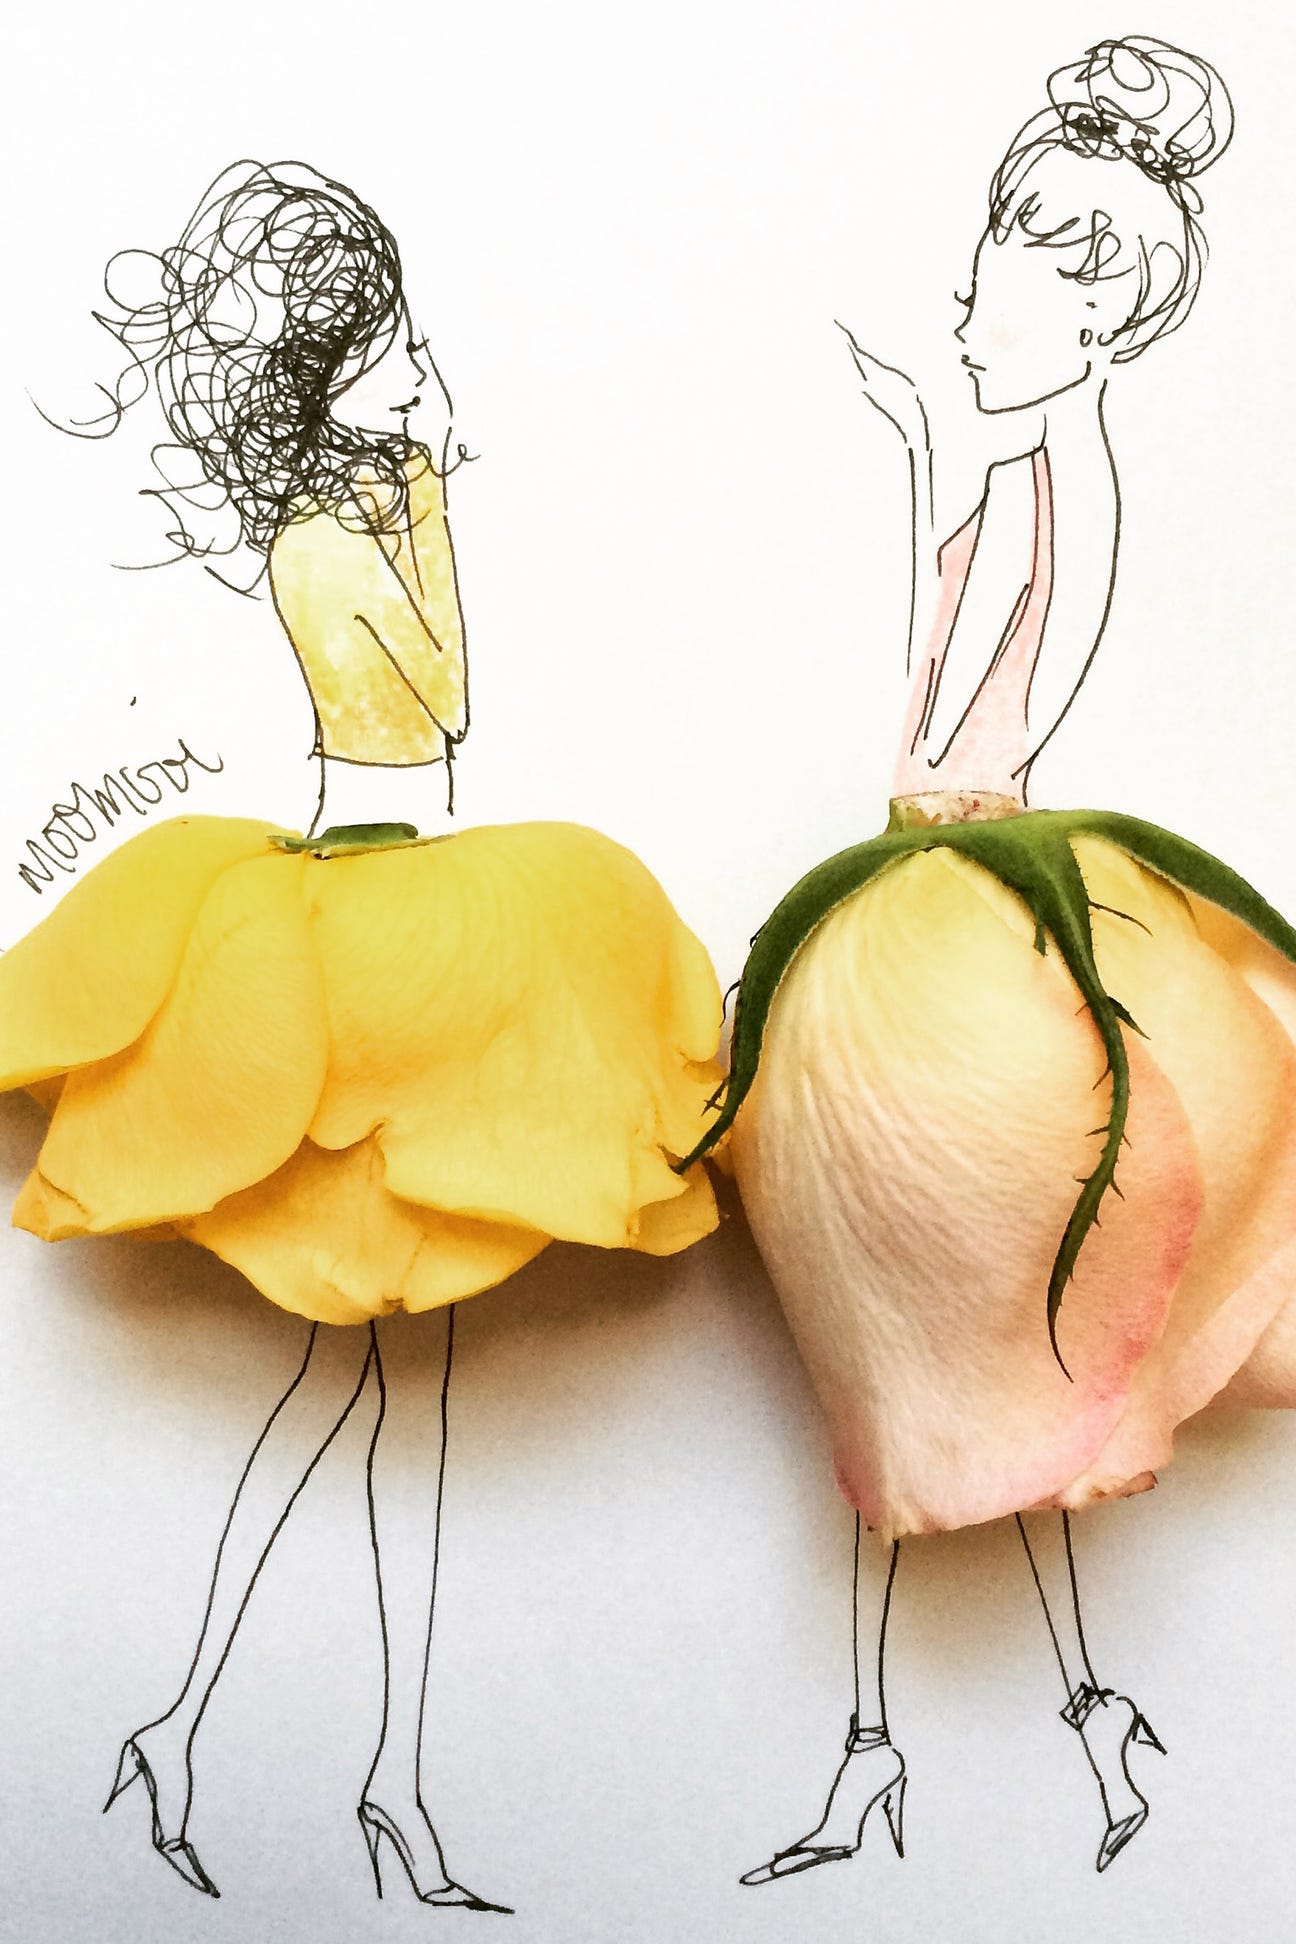
and here are my cards:
What started out as an assignment ended up being Mother’s Day cards for two of our daughters.
  • I used Altenew’s Adore You and Garden Treasure stamp sets.
  • I stamped the images in black and then colored each flower with my Altenew Alcohol Artist Markers.
  • I then cut out each image.
  • The lady’s form comes from the Couture stamp set by Dylusions. I stamped her on my panel, created my own sentiment and made it a label with gold and black & white accent strips of paper (a la Carissa Wiley :))
  • Then it was just a matter of playing with the flowers to place them; some petals I cut off to conform to the shape of the skirt. Tickles gave the flower centers just a little sparkle.

I could easily see myself creating these cards with a bunch of different Altenew floral stamps!!! I really love the way these turned out.

Thank you for stopping by! Michelle

Wednesday, April 11, 2018

Simon Says Stamp-Fluttering By April Release


Simon Says Stamp has released another great set of products just in time for Mother’s Day cards! Just look at all that goodness👀👀
I have the Adeline Butterfly from the new collection (and can’t wait to get my hands on some of the other goodies) so I created three very different cards with this one die. The die has two pieces:
Simon Says Stamp ADELINE BUTTERFLY Wafer Dies s542 Fluttering By zoom image
Here are my cards:
For card #1 I:
  1. watercolored in rainbow order a sheet of Strathmore watercolor paper, 
  2. embossed the dried page with Simon’s Ornate background die in black ink,
  3. die cut the butterfly several times from each color to maintain my rainbow order,
  4. die cut the centers of the image in dark cardstock,
  5. did a wonky cut of some PTI Orange Zest cardstock and glued it to my base,
  6. die cut a pierced circle and glued to the center of my card-this was popped up on foam tape,
  7. adhered the butterflies (or should that be flutterbies?) evenly spaced around the circle,
  8. added the sentiment from Simon’s Big Thanks Word set and matching Nuvo Drops.

For card #2 I:
  1. die cut a rectangle from Penny Black’s Antique Frames,
  2. added my sentiment from Hero Art’s Prayers stamp set,
  3. used foam tape and adhered this piece to the center of my base,
  4. die cut several Adeline butterflies and then embossed the wings with a Spellbinder’s Wonky Diamond’s folder,
  5. cut a few extra butterfly wings from vellum and then colored the backside with a rouge alcohol marker,
  6. cut in half and then offset and glued the vellum wings to the cardstock wings in order to create a dimensional effect (see below),
  7. added my centers to the matured caterpillars and covered them with Stickles for sparkle,
  8. arranged and foam mounted the finished butterflies to the base.

For card #3 I:
  1. stamped onto a panel several flowers from one of my favorite SSS stamp sets, Artful Flowers,
  2. colored the flowers with my Altenew Artist Markers,
  3. added one of the sentiments from the stamp set,
  4. added one plain, white butterfly popped up on foam tape,
  5. Stickles dots everywhere gives the card such a sweet sparkle, not overpowering.

The ideas for this die are limitless! I look forward to seeing other inspiration from the release.

Thank you for stopping by! Michelle