Wednesday, May 30, 2018

ODBD May 2018 Release-Cups & Mugs

Hello Friends!
“There is nothing better than a friend, unless it’s a friend with coffee." Can I get an Amen?!  Coffee is today’s theme as I share my final two cards from the ODBD May 2018 release. I LOVE THESE CARDS! I did very minimal stamping, these projects were almost all die cuts using the dies from the Cups & Mugs stand alone die set and Latte Love design paper pad from the release. Let’s take a look.

Card #1

First, how great are these papers? I really wanted to show them off.

  • I used the large coffee (or tea) cup from the die set and cut from several of the papers, I also cut some coffee beans (also included in the set) and sprinkled them under the sentiment. 
  • On a stitched rectangle panel I stacked the cups, some on foam tape, and added the sentiment from the Hug in a Mug set from this same release.  
  • All of this was mounted on to a 5 x 6.5 base.
  • You can see in the photos below the detail you get by cutting AND embossing the images.

Card #2

I love you a latte!
Sending a cup ‘o hearts :) This card was a hit with our 24-year-old. I die cut several hearts (also in set) from each paper, glued some directly to the paper and others popped up on foam tape. For the sentiment I used the Hug in a Mug set and gold heat embossed directly to the panel. I also added a small cluster to the inside corner of the card. I’ve shared several card angles below.


I hope you will take a look at the May release, I’d love to see what you do with these papers. You can find the release here.

Thank you for stopping by! Michelle

Wednesday, May 23, 2018

ODBD May 2018 Release-Come To Me

Hello Friends.
I have a couple more cards to share with you today using supplies from Our Daily Bread Designs May 2018 release. We go to the beach today with this lovely stamp set, Come To Me. The sentiment says “Be still and know that I am God”. Psalm 46:10. This is a great reminder today in this over saturated, busy, fast-paced, technological world we live in.

For this card I was inspired by colorful summer sunsets like this one from Pinterest.
Taken from Pinterest

Card #1

  • I first cut my panel using the largest die from ODBD’s double stitched rectangles and set the frame piece aside.
  • I Colored with Distress Oxides the top portion of my white panel; yellow, orange, pink and purple.   
  • I stamped the image and colored the rest of the scene with alcohol markers and used a white gel pen for detail on the chairs. 
  • For a cool bit of texture I used a snow pen to make the sea foam dimensional (see third picture).
  • I adhered the panel frame piece to a sheet of dark designer paper from the Latte Love paper pad cut down to size for my base. The stamped center rectangle I popped up with a piece of fun foam.
  • Just for a very light bit of sparkle I used Wink of Stella on the sky.

Card #2

  • I really wanted to highlight these lovely Adirondack chairs on my second card. I shared this embossing technique on a previous post; I taped all of the rectangle frames together and ran them through my die cutting machine to get this gorgeous embossed effect. I cut an additional small panel large enough for the stamped image.
  • I went with bright, cheery summer colors. Blue Distress Oxide ink for the sky and again alcohol markers for the rest. Clear glaze made the water shine.
  • I added the entire panel onto the blue sheet from the Birthday Brights paper pad.
  • I didn’t want to take away from the image so I put the sentiment on the inside (see below).
The entire May release is beautiful, you can find it here.

Wednesday, May 16, 2018

ODBD May 2018 Release-Hug in a Mug

Hi Friends!
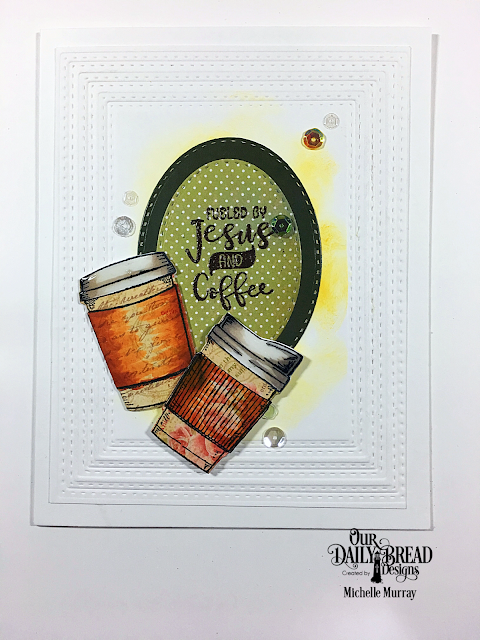
I’m back with two cards using another stamp and die set from the Our Daily Bread Designs May 2018 release, Hug in a Mug. Jesus and coffee? YES YES YES! I love coffee cards so I really enjoyed this project (Who am I kidding? I love making cards, period). This stamp and die set has great sentiments, I will be making several more cards with this one.

Card #1

“Fueled by Jesus and coffee” Yup. True story. In that order. Everyday. 🙏☕ How precious is this saying?! I need the tee-shirt. I digress.
One of the great features of ODBD dies is that they emboss as beautifully as they cut. You can see the result in the background above. 
  • To achieve this look I taped the three largest of the double stitched rectangle dies together as shown below. Using the embossing sandwich for my die-cutting machine I ran these dies through on top of a white panel. The result is just beautiful. I also embossed the ovals and other images used.
  • I lightly sponged some Fossilized Amber Distress Oxide ink in the center of my panel and glued the panel to a white base.
  • Using paper from the Latte Love and Blushing Rose paper pads, I cut two pieces to layer my sentiment. I heat embossed the sentiment to make it pop.
Another fun technique I like to use is paper piecing, which I did for the two cute coffee cups.
  • I stamped each cup three times; once on white card and again on two other pieces of the Blushing Rose designer paper collection. I then pieced the white tops and sleeves atop of each cup image.
  • I used alcohol markers to add a little shading.
  • I glued the cups on to the sentiment.
  • All that was left to do was add clear glaze to the lids and a few scattered sequins for a little sparkle. 

Card #2

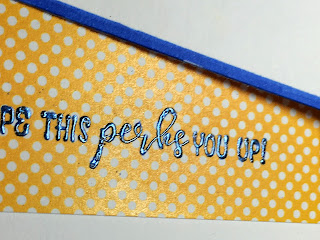
“I hope this perks you up!” I wanted a happy look for this card and I think blue and yellow fits the bill. I also did some partial die cutting on this one.
  • I partially die cut the cup into the top piece of my base. I gold embossed the image and colored it with alcohol markers.
  • On the inside of the card I layered a piece of yellow polka dot design paper from ODBD’s Birthday Brights pad. It peeks out underneath the top flap. Next I heat embossed the sentiment using a lapis blue powder.
  • I added the strip of blue by using my alcohol marker and a ruler to get the straight edge. 
  • I wanted to balance out the color so I added yellow Nuvo Drops to the top flap.
  • Clear glaze on the cup lid completes this card. This would make a great gift card holder.
May your day be peaceful and perky! Thank you for stopping by and leaving comments, they mean a lot to me. Michelle

Wednesday, May 9, 2018

ODBD May 2018 Release-Turtle Love


Hi Friends!
I am so thrilled to be guest designing for Our Daily Bread Designs in May and June. It is a major treat for me when my love for Scripture and my creativity can hang out together!  The May 2018 release brings us beach, tortoises, and coffee (another beautiful creation, don’t you think?)! I am sharing two cards today. My cards were created with this beautiful Turtle Love stamp and die set. The first Scripture stamp reads: “So God created the great creatures of the sea.” Genesis 1:21. This particular sentiment stamp takes us back to the beginning, the Genesis of creation. One only has to look to nature, animal and sea life to see the creativity and awesomeness of our God. If you are in search of Christian stamps you should check out ODBD here

Card #1

  • I started with a piece of craft cardstock (5 x 6.5). I shaded the edges with Distress Oxide Vintage Brown and gave it some watermarks to add interest and the appearance of bubbles.
  • Layered a sheet of dark green designer paper and distressed the edges with my scissors and also shaded the underside of the areas that would show (with the same ink mentioned above).
  • Atop the green paper I added this beautiful lighter green, damask print panel with stitched edges and again shaded the edges to keep everything visually tied together.
  • I stamped the sentiment on a strip of woodgrain paper, distressed the edges (see a pattern happening here?) and then added hemp cord on the side and secured in a knot. I popped this up on foam and adhered to the upper left corner.
  • I took a final 1/2 inch strip of the woodgrain paper, shaded the edges and underside, curled the edges like a scroll, and popped it up on foam tape. I set this entire panel aside.
  • Now it was time to work on my turtle. I stamped the turtle on white card and colored with alcohol markers. I covered his shell with clear glaze in an uneven manner to give a more realistic ‘bumpy’ effect. I covered his eye with a mini dot of black Nuvo Drops. And because I couldn’t help myself I added Wink of Stella to his body.
  • I glued him to a vellum stitched circle and popped the entire piece onto my completed panel.
Using the same techniques throughout the project gives the finished card a cohesive look. 

Card #2

The second card is a birthday card. My daughters thought this was cute, they love the pun-y sentiment-“Have a turtley awesome birthday!”. Using ODBD’s Birthday Brights paper pad along with clear glaze drops, I created an under-the-sea look. 
  • Using a stitched rectangle die I cut the blue paper panel. Using the turtle matching die I then cut the turtle image several times randomly throughout the sheet. I cut the image again several times from one of the green sheets in the paper pad and set those aside.
  • I then adhered the plaid sheet to my base and the blue sheet on top of the plaid.
  • Next I stamped the turtle image onto the green cut-outs and with foam tape put them back in their spots like puzzle pieces. The foam tape gave the turtles dimension and so they stand off the page. 
  • I brought my turtles “to life” by coloring them with alcohol markers and placing the tiniest black Nuvo drop to the eyes. You can see what a difference all this detail makes in the following picture.
  • All that was left to do was stamp and adhere the sentiment. For a final touch I used a nest of hemp cord under the sentiment and clear glaze drops give the illusion of bubbles.

Children love texture and this card is full of it, I think the recipient will love it!
Well I hope I’ve inspired you to create or to stop and reflect on the greatness that is all around us everyday!
Thank you for stopping by and leaving comments, it truly means a lot to me! Michelle