Wednesday, November 28, 2018

ODBD November 2018 Release-Poinsettia Box

Hi Friends!
Happy Thanksgiving, I hope your holidays are off to a great start. Today I am sharing three more Christmas cards using Our Daily Bread Designs Poinsettia Box stamp set.
Card #1
  •  The 6x6 Christmas Collection paper pad includes lovely, muted colors. I chose this lovely green panel and cut it out using the Double Stitched Rectangle Dies. I popped up with foam tape the outside and inner pieces leaving the first frame directly on the paper; this gives a cool dimensional effect.
  • To color the image I used alcohol markers. I initially colored the image with pink flowers but did not like the result so I stamped the flowers again, cut them out and colored them yellow and coral with a matching bow and then fled them on top of the originals. I colored the box with magenta and pinks. 
  • I added some bling to the centers of the flowers and to the box with glitter polka dots using Stickles. I adhered the box to my panel with glue.
Card #2
  • For this card I white heat embossed the image onto watercolor paper. I painted the image using Ken Oliver Color Burst in Merlot, Teal, and Phalo Green.
  • Once dried I used the Double Stitched Oval dies to cut it out as well as a piece of designer paper from the Christmas collection pad. I used the stitched rectangles to cut out my larger pink panel, again using one of the gorgeous designer papers.
  • For an added touch I dipped the entire edge of the watercolor panel into clear embossing ink and heat embossed using silver embossing powder.
Card #3
  • This card is my favorite of the bunch. It measure 4.25 x 9 inches. The flowers and matching bow were colored with alcohol markers in reds, greens and pinks (I couldn’t choose just one image to use). 
  • I covered them with Wink of Stella for a subtle, but stunning shine! 
  • I then stamped the image again on three different pieces of designer paper and cut out just the box area. I paper pieced the boxes onto the flat floral image using foam tape to give a dimensional look, I love the outcome!
  • Finally I covered the box portion in clear glaze, and then glued everything onto my base.
  • The Merry Christmas sentiment adds the final touch.

I have had such a great time playing with this November Poinsettia release, I hope I shared something to inspire you. Thank you to Our Daily Bread Designs for having me as a guest designer this month, it has been my honor!!

Thank you for stopping by!
Michelle

Tuesday, November 13, 2018

ODBD 2018 November Release-Merry Christmas

Hello All!
I am happy to share with you another beautiful poinsettia stamp/die set duo by Our Daily Bread Designs. This set, Merry Christmas, consists of one large poinsettia bloom, the coordinating die, and two sentiments. Isn’t she lovely! I created three different cards.
Card #1
  • I colored this image with blush and pink alcohol markers that matched perfectly with the designer paper from the 6x6 Christmas designer paper pad. I also used one of the wood grain sheets for the inside of the double stitched oval frame.
  • I glued everything to a white card base, 5 x 6.5 inches.
  • Clear glaze and a few green sequence in the center complete this clean and simple card. The bloom is so stunning, the card didn’t call for much else.
Card #2
  • Yellow poinsettias? Yes, please! This year I find myself into non-traditional Christmas colors. Again I used alcohol markers to color several blooms. The yellows and coral centers really jump off of this orange-y red designer paper.
  • I used a smaller die from the double stitched rectangle frames and gold heat embossed the simple “Rejoice" sentiment from this set.
  • As a finishing touch I used iridescent Stickles in the center of each bloom.
Card #3
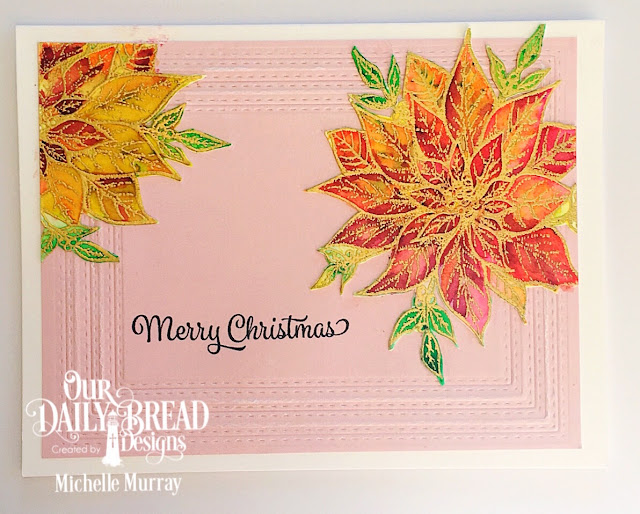
  • This card is my favorite of the bunch. The soft pink paper in this paper set is just gorgeous! I used the largest three double stitched rectangle frames to dry emboss my panel.
  • After gold heat embossing the images I water colored them using Ken Oliver Color Bursts; one of the colors is Merlot and it is stunning against the pink background and other orange colors.
  • “Merry Christmas" finishes off this card.

Well that’s all for me today, don’t forget to stop by ODBD and see the entire November release, it’s lovely.

Thank you for stopping by! Michelle

Wednesday, November 7, 2018

ODBD 2018 November Release-Joyful Christmas

Hello Friends!
Here we are at the start of another holiday season, hard to believe! ODBD November 2018 Poinsettia Bundle release is packed with gorgeous Poinsettias to help you get started on those holiday cards!  Floral cards are my most favorite so I thoroughly enjoyed creating these lovelies using the Joyful Christmas stamp and die set, I chose three different coloring mediums for my cards.  Let’s take a look.
First, here is a shot of the designer paper pad in this release. So soft and subtle:
and this is the Joyful Christmas stamp/die set:
Card #1
  • I colored the image with alcohol markers and then die cut the image. 
  • I used the designer papers and the largest die from ODBD’s double stitched rectangle panels and the 2nd largest double stitched circle and glued them onto my 5x6.5 inch card base.
  • The sentiment comes from the same set.
  • I adhered the flowers onto the circle. As a final touch I covered the petals with clear glaze.
Card #2
For this card I pulled out my vibrant Ken Oliver Colorburst watercolor powders. They really brought the poinsettias to life, the rich colors against the gold embossing powder. I used non-traditional poinsettia colors.
  • Once painted and dried and die-cut two images from watercolor paper and glued them directly to ta strip of the green designer paper.  
  • For the sentiment I used “Wishing you a joyous Christmas” stamped directly to the panel. This card has a little autumn feel to it and I love that you aren’t limited to using the stamp set for Christmas cards.
Card #3

  • This card measures 4.25 x 9 inches. I really like the way they turned out. I cut a sheet of 8.5 x 11 white cardstock in half.
  • I then stamped and gold heat embossed the flowers down the edge of the cardstock and colored them with my Prismacolor pencils.
  • I trimmed my panel to the desired length and added a few black “freckles” around the cascading flowers.
  • The sentiment comes from the same set and it reads  “Behold, I bring you good tidings of great joy.” Luke 2:10
This collection has given me a jump on my Christmas cards, I’m excited to share more with you in the weeks to come.

Thank you for stopping by! Michelle