Friday, September 22, 2017

Stretch Those Stamps-Frame Embellishments

Today I wanted to share something other than a card, this project is featured on the Right At Home blog today. I am always looking for ways to stretch my stamps and dies as I’m sure you are, and this project fits the bill.
For all of you planners out there I know fall events and even holiday prep work is starting; fall weddings, dinners, parties and the like. So I decided to create a table number frame embellishment as part of a centerpiece and thought to use leaves to dress this up. Enter the Fall Leaves stamp set. Besides collecting stamps, I have a ‘thing’ for ribbon (think Christmas tree décor) so I pulled out a few rolls of various colors and textures.

I stamped the leaves directly onto the ribbon and cut them out (if the ribbon isn’t too flimsy you can use the coordinating die set). No coloring necessary on these leaves as the fabric did all the work!

I adhered everything together with hot glue and then attached the small cluster of leaves to the frame with another drop of glue. Note: if you use a metal or glass frame or base, the hot glue can be easily removed after your event or holiday.

I then die cut from gold card the word “celebrate” using the Script Greetings die set and attached it to the center. Isn’t it precious? I could see using this technique to decorate a small wreath, napkin holders, place cards, etc.

Thank you for taking a moment to stop by I hope I’ve given you some inspiration to pretty all the things! 
xo-Michelle

Monday, September 18, 2017

Layered Floral Die

I am a HUGE fan of the Altenew company. They are one of the very first companies I purchased stamps from when I started card-making just over two years ago. Today I am sharing a unique product, their Fantasy Floral die set. I've never seen a layered image die before this. Because no stamping is involved I used pattern paper, colored paper, and also white paper that I colored with an ink pad. Seriously, all you do is die cut and adhere together!!! I purposely did not align the first and second layers to give the flowers a fuller look. I did add stitched detail with the Silly Stitched die set from Lil' Inker Design and the Postage Rectangle dies from Memory Box Co. Check out these projects:


I intend to use the following for baby shower cards. The stitched detail on these cards is from the Sweet Stitches die set by Right at Home stamps.


Thank you for stopping by! Michelle

Thursday, September 14, 2017

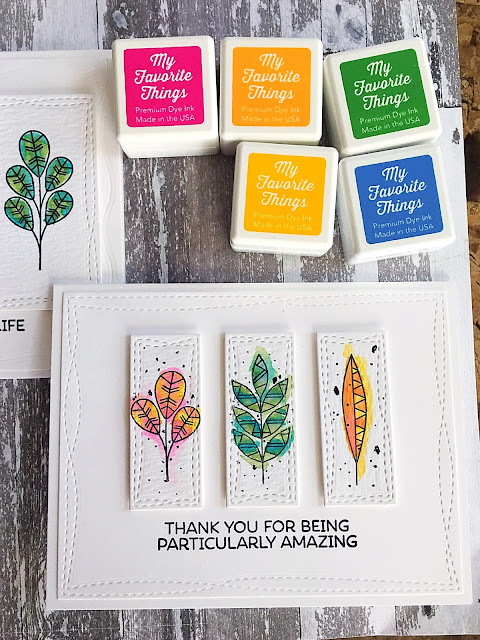
Thank You for Being Particularly Amazing

Lately I can't seem to get enough of fall leaves with all their rich colors and the promise of cooler temperatures (it's hot here in Texas!)🍁🍂
Because I don't really see many changing leaves in south Texas, stamp images on cards will have to do.
I created a couple of cards, A2 and A6 sizes, using the Geometric Greenery MFT stamps and various MFT inks and dies I have on hand.

Crafty friends, did you know you can watercolor with these inks? I had fun mixing the few colors I have to make additional colors and applied them to the images stamped on watercolor paper using the wet on dry technique (just means I put a wet medium on a dry surface).

I then used various size dies from the Wonky Stitched Rectangle set, and the Surf and Turf die set for the borders.

For the leaves, I first die cut the paper so I could then center the stamped image. I used Simon Says Stamp Intense Black Ink to stamp. On the smaller card I decided to add some paper freckles 😀 also known as splatter. The larger card I left clean.

At this point, before adhering the leaf images, I stamped the sentiments onto the panels. There are many other beautiful sentiments in this set!

I think the "trickiest" part of making these cards was centering everything, my trusty clear grid helped me there. Once my layout was figured out, I used foam tape on the images to pop them up and add some dimension and interest to these otherwise clean cards.

Finally, I mounted everything on to 110 lb. white card bases.


 The ink colors you see above are: Ripe Raspberry, Orange Fizz, Gumdrop Green, Daffodil, Blue Yonder
I hope you have a particularly amazing day and thank you for stopping by!
Michelle👋

Wednesday, September 6, 2017

The Ton-September Mood Board Challenge


🍁Autumn cards🍁

I am SO ready for cooler temperatures! I saw this mood board on The Ton Stamps Challenge Blog and it gave me all the feels!!! The beautiful colors stood out to me initially and then I zeroed in on the cute fox card on the top row. Something about chocolate-colored card stock that I think looks so rich. So here is my interpretation: 
I used several supplies from The Ton (listed and linked below). I stamped and heat embossed the floral border cling background stamp once on a brown card stock and again on a white sheet of 80 lb. Neenah solar white card (both A2 size).
I colored the white image with my ziggy zig zigs incorporating colors from the mood board. I then cut those images out and adhered them with liquid glue to my brown panel. Next I formed my sentiment from a couple different stamp sets, trimmed the panel down about 1/8 of an inch on all sides and then DRY embossed the stitched border by running it through my Spellbinders Platinum machine. Finally I mounted onto a brown card base. Voila!

Okay, now bring on the Pumpkin Spice latte!☕


Supplies Used:
Floral Border Cling Background stamp
Rose Gold Embossing Powder
Brushed Happy
Macarons
Glass Slippers Sequins
Double Stitched Rectangle Dies (Large)
110 lb. brown card stock from Recollections
Mini Misti
Zig clean color real brush markers


Thank you for stopping by! Michelle

Tuesday, September 5, 2017

My Sweet Petunia & Right At Home Blog Hop


Hello and welcome to your next stop of the My Sweet Petunia & Right At Home blog hop! You should have come from Giovana Smith page. Today the design teams are sharing some great inspiration using both the MISTI stamping tool and Right At Home stamps. Keep reading for more prize information🎉🎉
I will start by saying I am a huge fan of both companies! The MISTI was one of the first card-making tools I purchased; it’s a game changer. RAHS products are also among my favorite stamp companies. Today I am sharing with you one of my favorite techniques, stamping my own background patterns; it is my go-to when I can’t seem to find my mojo. Here are my cards, two 4.25 x 5.5 (A2) and one 5 x 7 (A7):

The process for all cards was the same; I used the Fall Leaves stamp set for the pattern. Thanks to my MISTI, I was able to re-stamp the images as needed for added shading (rock-and-roll technique) and getting great ink coverage. This tool also makes mass-producing cards a snap!     

For the A2 cards, I first stamped a 4.25 x 5.5 size of cream cardstock and later cut into two panels using both rectangle dies from the Find the Beauty die set for each card. For some added dimension and interest I popped up the smaller center panel of each card with foam tape.  These smaller stamped panels alone would also make great menu cards or place cards for your Thanksgiving dinner or fall party.

For the A7 card, I stamped a 5x7 cream panel and cut the edges clean. Next, I heat embossed a few different sentiments for the various cards using the Fall Sentiments stamp set and the Script Greetings and Sweet Stitches die sets. Finally, I added a little bling with matching colored sequins on the smaller cards and green deco foil accents on the larger. I finished by adhering each panel to a green colored base. 

I trust you are enjoying all the inspiration on this blog hop. Your next stop is the super talented Chris Dayton. If you experience a broken link or would like to start at the beginning see full list below.

Prize Info:
Two winners will be drawn from all the comments on the hop, but you must leave a comment on every blog to be eligible to win one of two prizes: Winner's choice of an original or mini MISTI, plus a prize package from Right at Home that includes the Sunflower stamp set, newly released Harvest Blessings stamp set, and two Distress Oxide Inks in Cracked Pistachio and Peeled Paint! Deadline for comments is September 8th at noon Central. Be sure to visit My Sweet Petunia and Right at Home blogs on Tuesday September 12th to see if you are one of the winners. 
Happy blog hopping!-Michelle    

Design Team