Wednesday, June 27, 2018

ODBD June 2018 Release-Brothers and coloring pages

Hi crafty friends!
This is my last post as the May/June guest designer for Our Daily Bread Designs. A BIG thank you to ODBD for the wonderful opportunity. Today I am sharing a couple of cards using the Brother in Christ stamp set as well as some adorable coloring pages that make awesome card sets!
Card #1
This particular stamp is one solid image, as shown below, but I wanted parts of it in color. I was able to do that by using my Zig watercolor markers and a piece of watercolor paper.
  • I placed my image in my stamp positioner.
  • I colored a section at a time with the markers and then spritzed it lightly with water, then stamped. Having the fine tip on the markers allowed me to get into the tiny places. It is important not to over wet the stamp as you will have a big blob of color and lose the definition of the image.
  • I allowed that to dry and then using Distress Oxide inks colored in the sky.
  • After the panel was dry I cut it out using the ODBD’s double stitched rectangle dies.
  • I colored an additional piece of the same paper and cut out using double stitched circle dies and added the sentiment. I popped it up on double sided foam tape and adhered to the panel.
  • I matted this piece onto a piece of blue designer paper from the Birthday Brights paper pad.
  • Finally I glued the entire panel onto a 5x6.5 base card.
original image
Card Set
ODBD has available the cutest set God’s Beauty coloring pages with several images to choose from. I selected a few sheets and colored them with my alcohol markers. After matting them, they fit nicely onto 4.25x5.5 cards. Perfect to send a note. I used sentiments from the June release.
And here are some water scenes, again with crystal glaze drops for added interest:
You can find the entire June release here.
Thank you for stopping by! Michelle

Wednesday, June 20, 2018

ODBD June 2018 Release-Sisters

Hello crafty friends!
This week is all about the Sisters. Our Daily Bread Designs has several great items to help you make adorable cards for that special sister or sister in Christ. You can purchase the image and sentiment combo sets or the images individually.
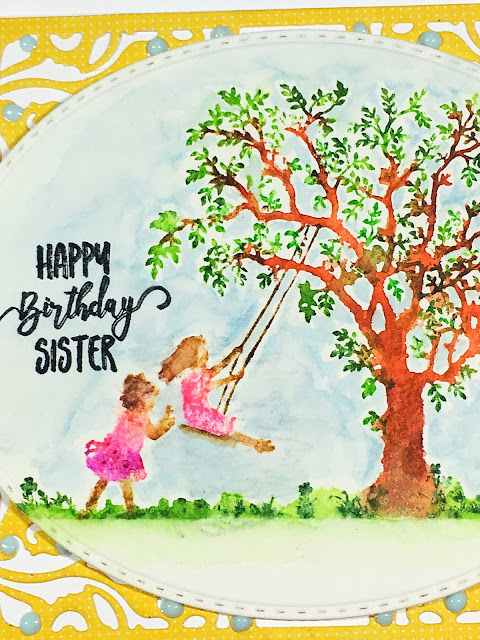
And here is my first card:
As you can see by the product image, these are solid stamps. In order to color the image from the Sister in Christ set I used my Zig watercolor markers.
  • On a sheet of watercolor paper I started by using a marker to color only the tree trunk and branches, let that dry and then went on to the other parts of the image. I used my stamp positioner to hold the stamp in place so the image would not shift.
  • I used a very light blue marker for the background.
  • I cut out the image using ODBD’s Double Stitched ovals die. 
  • The sentiment came from the same stamp set.


  • I used another new product from this release, the Lacey Corners die, on a piece of yellow design paper from the Birthday Brights collection. I glued the image to the intricate background and then glued the entire piece to a white base.
  • I added Duck Egg Blue Nuvo drops for added interest.

Card #2
  • For this simple card I decided to keep the Sister Time image in black. 
  • I cut the card using the double stitched rectangle die, added my sentiment and framed the panel with beautiful purple papers from the Purple Pizzazz collection.
  • The entire piece was glued to a white base.

With all of the sweet sentiments, you could make so many different cards. I hope you are inspired to try a few and don’t forget to use #ourdailybreaddesigns if you post on social media so we can see your creations!
Thank you for stopping by! Michelle

Wednesday, June 13, 2018

ODBD June 2018 Release-Lacey Corners

Hello crafty friends!
Today I bring you an elegant Lacey Corners die from Our Daily Bread designs’ June release. This is such an intricate die, useful for so many different occasion cards and styles. Let’s take a look.
Card #1
  • For this first card I used a metallic cardstock atop a sheet of ODBD’s Purple Pizzazz paper pad. I chose this gorgeous eggplant-colored purple.
  • The sentiment comes from a new sentiment die set called Celebration Words.
  • DONE, seriously that was it. You can add an additional sentiment inside.
How beautiful is this die? I need it in all the metallic colors :)

Card #2
I didn’t have to do much for this card either. 
  • I embossed the die on 80 lb white card. 
  • I then used the die on a sheet from the Wedding Wishes paper pad. I took the middle piece and glued it to the white base in the center.
  • Again the sentiment comes from the Celebration Words die set. I glued it to a strip of vellum just to make it stand out more.
  • I matted all of this onto a gold sheet from the same paper collection and then glued the finished piece to a white card base. 
Something about white on white that is so classy and elegant. I love it. You can see the depth of the embossing in the second picture.
Done!
Can’t wait to use this die on various colors of cardstock, I will leave the center blank and add a sentiment as the occasion requires.
I hope you take a moment to check out the entire June release.

Thank you for stopping by! Michelle

Wednesday, June 6, 2018

ODBD June 2018 Release-Brother In Christ

Hello crafty Friends!
This week Our Daily Bread Designs came out with their June release. It’s full of sibling love, take a look:
I have four siblings, two brothers and two sisters, and they mean the world to me. We are very close, so this release is a fantastic group to add to my collection. Today I am sharing two cards from the Brother in Christ set, such a serene scene. This set is perfect for the fisherman in your life, your brother or your father!
Card #1
  • I colored the background with blue Distress Oxide inks and stamped the sentiment and image in black ink. 
  • I used ODBD’s double stitched rectangle dies and created interest by popping up on foam every other layer (see the detail in the second picture below). 
  • I adhered all of this to a sheet of designer paper from the Nautical collection and then mounted everything to a white card base.

Card #2
For this card I wanted the image to really stand out. 
  • I took the double stitched circles, spaced evenly and taped them in place and embossed them on white cardstock. I am obsessed with this technique, I think it adds such beautiful detail to the card and really doesn’t need much else! 
  • I then stamped, heat embossed with clear embossing powder for shine, and then cut the image using the same circular die set.
  • I adhered with foam tape the image to the center of the circle. 
  • I applied this piece to the left side of my panel and cut off what was hanging over the side. 
  • I used a strip of the same nautical paper as on the previous card but also added a dark sheet of design paper from the Ephemera Essentials paper pad and added this behind the circle.  
  • That was matted with the same darker paper; I then glued all of this to a white card base. I love a good neutral color combination; it is perfect for masculine cards.  
*Note: both of my cards are 5x6.5
Father’s Day is approaching and I think the images in this set could be used for cards for that occasion.
I hope you will take a look at the June release; we would love to see your creations! Post them to Instagram and use #ourdailybreaddesigns.
Thank you for stopping by! Michelle